OpenVas: Vulnerability Scanning | Installation Guide

- Introduction:
OpenVAS is a vulnerability scanner that analyzes endpoints and web apps to uncover and detect flaws. Corporations frequently employ it as part of their mitigation strategies to initially identify any weaknesses in their operational or testing servers and apps. This isn't an ultimate solution, but it can assist in the elimination of any common weaknesses that may have sneaked through the gaps.
- Installation:
There are three methods to install GreenBone openVas:
1- Install from Kali/OpenVas repositories:
sudo apt-get update -y && sudo apt-get upgrade -y && sudo apt-get dist-upgrade -y
sudo apt-get install openvas
sudo gvm-setup
sudo gvm-check-setup
2- Install from source (Manually):
github.com/greenbone/openvas-scanner
3- Run from docker:
The easiest way since it only needs Docker installed, then by tapping one command you get the client started. The docker was developed by https://twitter.com/mikesplain
sudo dnf install docker
sudo apt install docker.io -- for Ubuntu & Debian
- Start the docker daemon:
sudo sytemctl start docker
- Download the container:
docker run -d -p 443:443 --name openvas mikesplain/openvas

- This command will grab the container from the docker registry and start it up (the installation can take several minutes to finish) so be patient!; if everything goes well you should see (Downloaded newer image for mikesplain/openVas:latest)

- Once the installation is complete go to https://127.0.0.1 in your preferred browser, OpenVAS will be ready to go.
Username: admin
Password: admin

You should be seeing a dashboard identical to the one below when you successfully logged into OpenVAS.

Initial configuration:
luckily, openVas include a wizard to make the process of setup straightforward.
- First, click on Scans > Tasks.


- After you start the scan, you need to grab a cup of coffee as openVas needs quite some time to finish the scan.

- Once the scan has finished, navigate to Scan > Reports
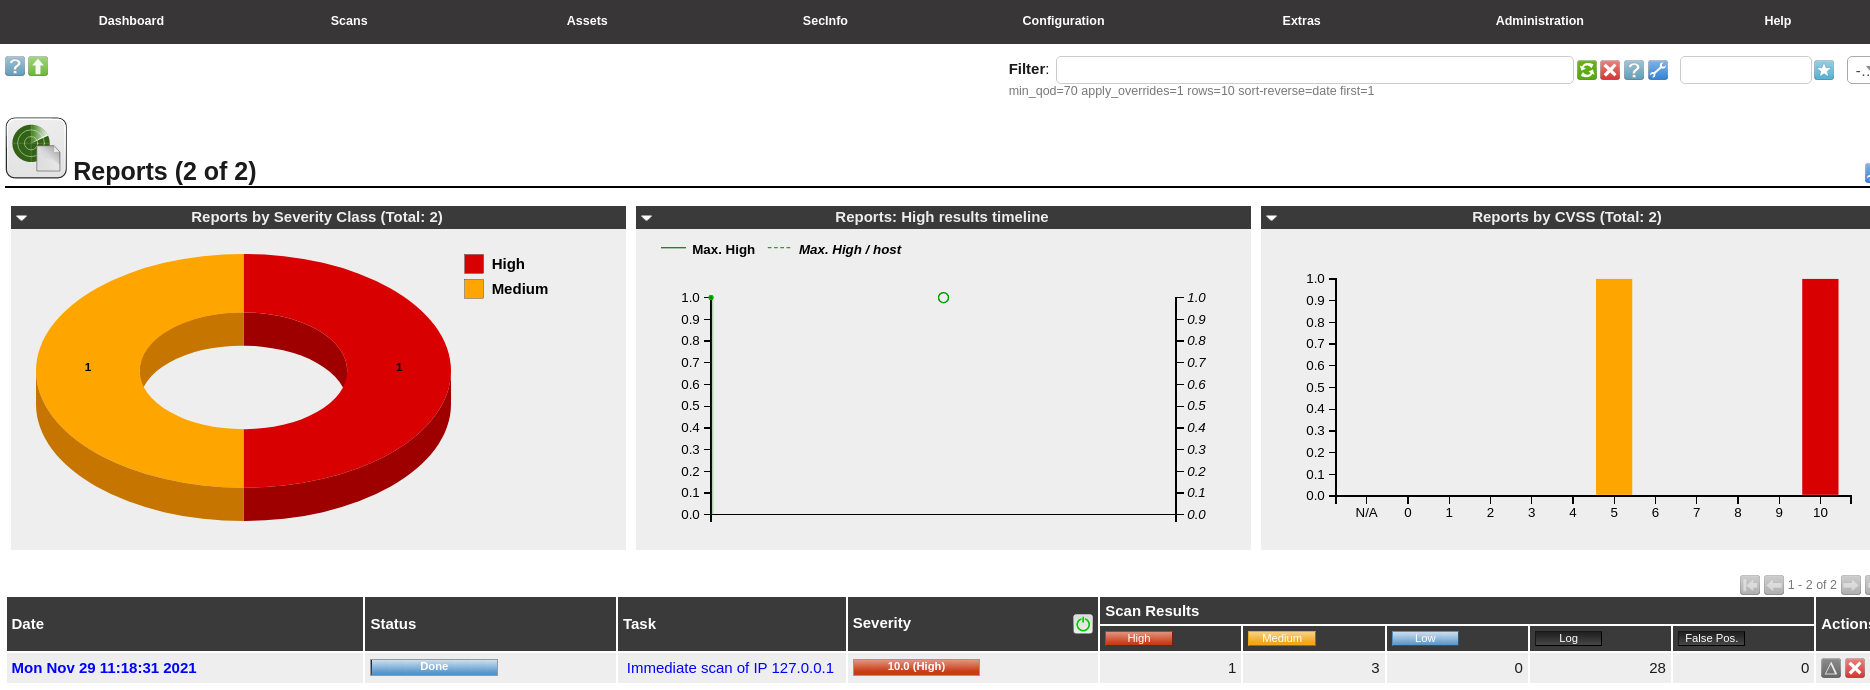
- Click on the last created report from your previously launched task to see details.

- You can enter an item from the Vulnerability list to see full details.
- Scanning a remote server:
- The remote server is connected via OpenVPN, so the first thing to do is OpenVPN installation:
sudo dnf install openvpn
openvpn Downloads/configuration_file.ovpn


Comments
Post a Comment