Nmap: 'The' Reconnaissance Tool

Introduction
Nmap or Network Mapper is a free (open-source) network exploration and security investigating tool. It can be also beneficial for jobs like network inventory, coordinating application update plans, and tracking host or service uptime. Nmap analyzes raw IP packets in unique ways to figure out what hosts are on the network, what services they offer (giving names and versions), what operating systems (names and versions) they're using, what kind of packet filters/firewalls they're using, and lots of other information. you can find more details here.
Disclaimer: This thread is for educational purposes only, same as all other information available on this site.
Installation
If you're using Kali then you'll find Nmap pre-installed, otherwise, you can install Nmap using apt-get:
- Update package list: sudo apt-get update
- Install Nmap: sudo apt-get install nmap -y

- Verify version: nmap --version

The output provides detailed information about Nmap. In this example, the version installed on my machine is 7.92, and it's indeed the latest available version, you can check it here.
- Verify version: nmap --version
The output provides detailed information about Nmap. In this example, the version installed on my machine is 7.92, and it's indeed the latest available version, you can check it here.
Switches (most used arguments)
After installation, you can start Nmap directly from the Linux terminal by taping the word nmap followed by some of the arguments to specify the method by which the command is interpreted, a very common one is the -sS option which allows Nmap to perform a Syn Scan (more on this later).
(in fact, you must always take advantage of the -h, and the man with all Linux commands because remembering arguments is not the solution when using the terminal).

- Host discovery

-Pn (no ping): By default, Nmap does host discovery and then performs a port scan against each host it determines is online, and since the ping scan uses ICMP, Windows hosts will not appear with the default scan because Windows Firewall blocks ICMP echo requests from the network (more on this later), you can use the -Pn option to skip host discovery and port scan all target addresses. this option will take more time as it performs port scanning on all hosts even the down ones.

As you can see above the ping scan took about 2 seconds whereas the no-ping scan took more than one minute, so a good practice is to start with the ping sweep first to enumerate up hosts, then go ahead to port scanning.
- Scan types
- TCP Connect Scans (-sT): when this argument is used, nmap will try to perform a three-way handshake with each target's ports, this scan is the default scan when you do not have raw socket privileges.
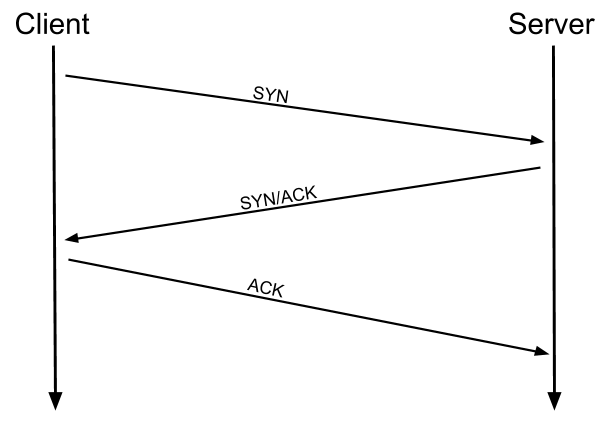
- by the response it receives from each port nmap will conclude whether the port is open or not, there are three possibilities:
A- Open port: when receiving a SYN/ACK packet.
B- Closed port: when receiving a RST (reset) packet.
C- Filtered port: when not receiving anything (the port is hidden behind a firewall).
- this scan takes more time to complete and it is more detectable than the other types of scans because it establishes a full TCP connection with the target.
- TCP SYN Scan (-sS): usually known as Half-open or Stealth scan, this scan is a little different from the TCP Connect scan as it responds to the SYN/ACK packet with a RST flag packet, meaning that the client initiates the connection then he runs away from it. this scan is the default scan when the privileges are available and can't be launched without permissions, it can perform fast port scanning without being restrained by firewalls and old IDSs. The Stealth scan has the same rules (Open|Closed|Filtered) as the TCP Connect scan.

- UDP Scan (-sU): this scan is significantly slower and more difficult to scan, because UDP is connectionless protocol as it keep sending packets without any type of verification and hope that they arrive to the destination, there are two possible results with this scan:
A- Open|Filterd port: when a packet arrive to an open UDP port, no response is expected. in this case nmap mark this port as open|filtered meaning that there's also a possibility that the port is hidden behinf a firewall.
B- Close port: this happens when the target respond with ICMP "unreachable".
Because it's so difficult to tell whether a UDP port is open, these scanners are very slow compared to TCP scans (more than 15 minutes for 1000 ports). So it's good practice to run nmap on the most used UDP ports.
Ex: nmap -sU --top-ports 10 2.0.0.2 (scan the top 10 most used UDP ports)


Comments
Post a Comment